Showing posts with label Blogging Tips. Show all posts
Thursday, December 11, 2014

How To Get Custom URL For Google Plus Profile ?

Blogging Tips, Internet Tricks, Blogger Tutorials, Google Plus, Custom URL
Have you ever noticed the link or URL of my Google+ Profile  in the above screenshot ? Yes, it's custom with name or username and long code is now removed from my profile. Recently Google has added a new featured which is the custom URL for Google+ accounts and profiles it's really a great update and looking very awesome because most of the people looking very irritated with the long code which is present in the long old URL. In this post i m going to show that how to change a long profile to a custom URL which will be very short than a previous one.

As you know that Google recently announced the custom URL for their users because the long seems long, bad, annoying and irritating people many times, because it's very difficult to remember the long URL. So this the new simple and easy way to which can be remembered just seeing it by one time. Before getting your custom URL i recommended you strongly read the terms and conditions, policies and principles of this new feature. Google+ Custom URL Term of Use

Now this an awesome feature to create a profiles which have good number of followers and friends, you can also add a profile and cover pic and add information like date of birth, living place and work etc, but it should be verified with your phone number and you should get an authorship if you have blog or website. It means that have strong profile. If you have all these thing then you can easily get it. Follow the below tutorial if you want to get a custom URL of for your Google+ profile.

How To Get Custom URL For Google Plus Profile ?

There is not a big thing in getting a custom URL but once if you are eligible for this feature then you can get easily within a few seconds. Just follow the below simple instructions.
  • Sign in to your Google+ account.
  • Goto profile.
  • You will see a blue notification which is asking for getting custom URL.
  • Click on get it button.
  • Now it will asking for confirmation and choosing your own custom URL.
  • Change or Edit and confirm it in last.
  • Finally you are done it.

Final Words

Guys i don't think it's very difficult for getting a custom URL for Google+ profile. Now this custom URL and share this tutorial with friends. If you have Google+ pages and you are eligible then you can also get a custom URL for you page also, and if you can't see the blue notification then complete your profile and verify your authorship and soon you will get keep visiting for more tricks. Cheers!
Read more
Friday, November 21, 2014

How to Fix Image Thumbnail Not Appearing Bug in Blogger ?

Hello guys hopefully you all will be fine, if you use blogger on the daily basis and update your blog, then you have noticed this morning that your entire image thumbnails suddenly disappeared from the main page of your blog. This leaves you thinking that you might have done some unnecessary editing to your blog template, which might be the big reason of not showing image thumbnails on the home page or archives pages, But that is not the case image thumbnails are broken because recently blogger users facing a new bug. Today i m show you that how to fix image thumbnails appearing bug in blogger.
Blogger Tutorials, Blogger Tricks, Blogging Tips

Why Image thumbnails are not appearing? 

The first thing is that you would be concerned about this bug, that why explosive pictures thumbnails stopped working ? Even you didn't do any thing with or do any kind of changes to your blog template even tired to upload free new template but the problem is same. If you are facing this drawback, but you are not alone almost all blogger users are facing this problem with new and old images thumbnails on their blog. Publishing new posts by uploading and image by adding a post title little content and publish it. Now goto your blog you still don't see image thumbnail on main page of the blog. But stay calm because we have a simple and trick to solve this bug.

How to fix image Thumbnails stopped appearing in blogger ?

The first thing need to do is to go to Blogger >> Posts when you published the post click on the edit and goto post editor and now revert it to Html tab and search the following code.
src="http://
Find all the Urls which starts with http:// to https://. After making these changes then update the post again and image thumbnails will start appearing again on the main page of the blog. This issue is caused by blogger which not giving permission to https:// image thumbnails to appear. We hope you like this simple trick and this bug would be completely fixed by blogger sooner or later. Let us know if you are facing any problem related to this post comment it in the below box.
Read more
Friday, November 14, 2014

How To Remove Powered By Blogger From Blog ?

Blogger Tricks, Blogger Tutorials, Blogging Tips
Blogger is one of the biggest and free blogging platform and you share can your knowledge with different people throughout the world. So we must give a credit for their services and we can do it by adding attribution in our blogs. Basically this is a gadget and sometimes we found this gadget on unwanted places like above post title, header, sidebar or anywhere else and we will remove this gadget and make our more attractive. Here we will going to share one of the simple and easy method which helps to remove this attribution and it looks like this "Powered By Blogger". If you tired and want to remove this gadget from your blog but it will looks like that this gadget is lock and you can't remove this gadget from your blogger blogs. If you want to unlock this gadget and want to remove this. So below is the simple trick and we will mention each and every step clearly and with fully detail that help to understand easily.

How To Remove Powered By Blogger From Blog ?

  • Goto blogger dashboard.
  • Now goto template and click on Edit Html.
Blogger Tricks, Blogger Tutorials, Blogging Tips
  • Find the below code by pressing Ctrl+F in your template.
<b:widget id='Attribution1' locked='true' title='' type='Attribution'>

  • Copy the below code and replace it with the above one.
<b:widget id='Attribution1' locked='false' title='' type='Attribution'>

  •  Click o the save button and you almost done it.
  • Now goto layout and find attribution gadget will appear click on edit.

Blogger Tricks, Blogger Tutorials, Blogging Tips
  • Now pop up window will appear simply click on remove button.
Blogger Tricks, Blogger Tutorials, Blogging Tips
This is the simple and easy way to remove attribution from the blog. Share your ideas and feel free to ask if you have any question in the below comment box. Stay Blessed and Happy Blogging
Read more
Thursday, November 06, 2014

Add Feedburner Recent Comment In Blogger

Recent comment widget is such an amazing tools which is developed by feedburner and successfully launched on four major popular blogging platform also including blogger proudly. To learn published recent comments the most discussed article across readers or visitors, instant feedback from them. There is no alternative or quick solution without Google feedburner recent comment widget. This widget allows both readers and authors comments on specific topic. So guys today in this post we will discuss that how to recent comment widget in blogger and to drive more traffic to blog which helps to increase click and impressions to make money. Follow the below tutorial for adding recent comment widget to blogger.
Blogger Widgets, Blogger Tutorials, Blogging Tips

How To Add Feedburner Recent Comment In Blogger ?

  • Goto blogger dashboard.
  • Layout >> HTML/JavaScript
  • Copy the below code and paste it inside pop up window.
<style type="text/css">
.recent-comment        { margin-bottom:10px; padding-left: 24px; }
.recent-comment img {
border: 1px solid #666;
padding: 2px;
opacity: 0.4;}
.recent-comment img:hover {
border: 1px solid #ddd;
opacity: 0.9;
}
.recent-comment a {
color:#ddd;}
.recent-comment-admin  { background-color: #fff; }
.recent-comment-ico    { margin-left:-20px;margin-top:4px;float:left;margin-right:3px;}
.recent-comment-header {}
.recent-comment-body   {
font-size: 90%;
font-style: italic;
font-family: helvetica;
color: #888;}
.recent-comment-footer { font-size: 85%; }
</style>
<script type="text/javascript">
//
// CONFIG:
var numRecentComments = 6;
var numPerPost = 2; // max comments per post (to try) or 0
var maxCommentChars = 100;
var maxPostTitleChars = 0; // if 0, use full post title
var txtWrote = 'says:';
var txtMore = 'More &#187;';
var txtTooltip = '[user] on &quot;[title]&quot; - [date MM/dd/yyyy hh:mm]';
var txtAnonymous = ''; // empty, or Anonymous user name localized
// Variables [xxx] in texts:
// supports [title], [user], [date], [time], [datetime], [date format]
// format supports: yyyy=long year, yy=short year, MM=month(01-12), dd=monthday, hh=hour, mm=min, ss=sec
var getTitles = true;   // false faster
var trueAvatars = true; // false faster
var urlMyAvatar = '';   // can be empty (then it is fetched) or url to image
var urlMyProfile = '';  // set if you have no profile gadget on page
//
var cropAvatar = true;
var sizeAvatar = 16;
var urlNoAvatar = "https://blogger.googleusercontent.com/img/b/R29vZ2xl/AVvXsEjxX00GPL4zCuF1cCN3lOItHeGxxrEVXEzH_w-vYuQEy31jWYE0gslEkO-jORI7a9AOT8P22qE2xkqO-lS4r6XK6Ueq7R2IaB3kS_IJQjaS-NTRF6uQwB9P-w5y5uu8KQ-nGGnFvUh2iN0/"+sizeAvatar+"/avatar_blue_m_96.png"; // http://www.blogger.com/img/avatar_blue_m_96.png resizeable
//
var urlAnoAvatar = 'https://blogger.googleusercontent.com/img/b/R29vZ2xl/AVvXsEjxX00GPL4zCuF1cCN3lOItHeGxxrEVXEzH_w-vYuQEy31jWYE0gslEkO-jORI7a9AOT8P22qE2xkqO-lS4r6XK6Ueq7R2IaB3kS_IJQjaS-NTRF6uQwB9P-w5y5uu8KQ-nGGnFvUh2iN0/s15/avatar_blue_m_96.png?d=mm&s=' + sizeAvatar;
var maxResultsPosts = "";       // or for example "&max-results=100"
var maxResultsComments = "";    // or for example "&max-results=300"
// CONFIG END
var urlToTitle = {};
function replaceVars(text, user, title, date) {
  text = text.replace('[user]', user);
  text = text.replace('[date]', date.toLocaleDateString());
  text = text.replace('[datetime]', date.toLocaleString());
  text = text.replace('[time]', date.toLocaleTimeString());
  text = text.replace('[title]', title.replace(/\"/g,'&quot;'));
  var i = text.indexOf("[date ");
  if(i > -1) {
    var format = /\[date\s+(.+?)\]/.exec(text)[1];
    if(format != '') {
      var txtDate = format.replace(/yyyy/i, date.getFullYear());
      txtDate = txtDate.replace(/yy/i, date.getFullYear().toString().slice(-2));
      txtDate = txtDate.replace("MM", String("0"+(date.getMonth()+1)).slice(-2));
      txtDate = txtDate.replace("mm", String("0"+date.getMinutes()).slice(-2));
      txtDate = txtDate.replace("ss", String("0"+date.getSeconds()).slice(-2));
      txtDate = txtDate.replace("dd", String("0"+date.getDate()).slice(-2));
//or: txtDate = txtDate.replace("dd", date.getDate());
      txtDate = txtDate.replace("hh", String("0"+date.getHours()).slice(-2));
//or: txtDate = txtDate.replace("hh", date.getHours());
      text = text.replace(/\[date\s+(.+?)\]/, txtDate)
    }
  }
  return text;
}
if(urlMyProfile == "") {
  var elements = document.getElementsByTagName("*");
  var expr = /(^| )profile-link( |$)/;
  for(var i=0 ; i<elements.length ; i++)
    if(expr.test(elements[i].className)) {
      urlMyProfile = elements[i].href;
      break;
    }
}
function getPostUrlsForComments(json) {
  for(var i = 0 ; i < json.feed.entry.length ; i++ ) {
    var entry = json.feed.entry[i];
    for (var k = 0; k < entry.link.length; k++ ) {
      if (entry.link[k].rel == 'alternate') {
        href = entry.link[k].href;
        break;
      }
    }
    urlToTitle[href] = entry.title.$t;
  }
}
function showRecentComments(json) {
  var postHandled = {};
  var j = 0;
  if(numPerPost) {
    while(numPerPost < numRecentComments) {
      for(var i = 0 ; i < json.feed.entry.length ; i++ ) {
        var entry = json.feed.entry[i];
        if(entry["thr$in-reply-to"]) {
          if(!postHandled[entry["thr$in-reply-to"].href])
              postHandled[entry["thr$in-reply-to"].href] = 1;
          else
              postHandled[entry["thr$in-reply-to"].href]++;
          if(postHandled[entry["thr$in-reply-to"].href] <= numPerPost)
            j++;
        }
      }
      if(j >= numRecentComments)
        break;
      numPerPost++;
      j = 0;
      postHandled = {};
    }
    if(numRecentComments == numPerPost)
       numPerPost = 0;
  }
  postHandled = {};
  j = 0;
  for(var i = 0 ; j < numRecentComments && i < json.feed.entry.length ; i++ ) {
    var entry = json.feed.entry[i];
    if(numPerPost && postHandled[entry["thr$in-reply-to"].href] && postHandled[entry["thr$in-reply-to"].href] >= numPerPost)
      continue;
    if(entry["thr$in-reply-to"]) {
      if(!postHandled[entry["thr$in-reply-to"].href])
          postHandled[entry["thr$in-reply-to"].href] = 1;
      else
          postHandled[entry["thr$in-reply-to"].href]++;
      j++;
      var href='';
      for (var k = 0; k < entry.link.length; k++ ) {
        if (entry.link[k].rel == 'alternate') {
          href = entry.link[k].href;
          break;
        }
      }
      if(href=='') {j--; continue; }
      var hrefPost = href.split("?")[0];
      var comment = "";
      if("content" in entry) comment = entry.content.$t;
      else                   comment = entry.summary.$t;
      comment = comment.replace(/<br[^>]*>/ig, " ");
      comment = comment.replace(/<\S[^>]*>/g, "");
      var postTitle="-";
      if(urlToTitle[hrefPost]) postTitle=urlToTitle[hrefPost];
      else {
        if(hrefPost.match(/\/([^/]*)\.html/)) postTitle = hrefPost.match(/\/([^/]*)\.html/)[1].replace(/_\d{2}$/, "");
        postTitle = postTitle.replace(/-/g," ");
        postTitle = postTitle[0].toUpperCase() + postTitle.slice(1);
      }
      if(maxPostTitleChars && postTitle.length > maxPostTitleChars) {
        postTitle = postTitle.substring(0, maxPostTitleChars);
        var indexBreak = postTitle.lastIndexOf(" ");
        postTitle = postTitle.substring(0, indexBreak) + "...";
      }
      var authorName = entry.author[0].name.$t;
      var authorUri = "";
      if(entry.author[0].uri && entry.author[0].uri.$t != "")
        authorUri = entry.author[0].uri.$t;
 
      var avaimg = urlAnoAvatar;
      var bloggerprofile = "http://www.blogger.com/profile/";
      if(trueAvatars && entry.author[0].gd$image && entry.author[0].gd$image.src && authorUri.substr(0,bloggerprofile.length) == bloggerprofile)
        avaimg = entry.author[0].gd$image.src;
      else {
        var parseurl = document.createElement('a');
        if(authorUri != "") {
          parseurl.href = authorUri;
          avaimg = 'http://www.google.com/s2/favicons?domain=' + parseurl.hostname;
        }
      }
      if(urlMyProfile != "" && authorUri == urlMyProfile && urlMyAvatar != "")
        avaimg = urlMyAvatar;
      if(avaimg == "http://img2.blogblog.com/img/b16-rounded.gif" && urlNoAvatar != "")
        avaimg = urlNoAvatar;
      var newsize="s"+sizeAvatar;
      avaimg = avaimg.replace(/\/s\d\d+-c\//, "/"+newsize+"-c/");
      if(cropAvatar) newsize+="-c";
      avaimg = avaimg.replace(/\/s\d\d+(-c){0,1}\//, "/"+newsize+"/");
      if(authorName == 'Anonymous' && txtAnonymous != '' && avaimg == urlAnoAvatar)
        authorName = txtAnonymous;
      var imgcode = '<img height="'+sizeAvatar+'" width="'+sizeAvatar+'" title="'+authorName+'" src="'+avaimg+'" />';
      if (authorUri!="") imgcode = '<a rel="nofollow" href="'+authorUri+'">'+imgcode+'</a>';
      var clsAdmin = "";
      if(urlMyProfile != "" && authorUri == urlMyProfile)
          clsAdmin = " recent-comment-admin";
      var datePart = entry.published.$t.match(/\d+/g); // assume ISO 8601
      var cmtDate = new Date(datePart[0],datePart[1]-1,datePart[2],datePart[3],datePart[4],datePart[5]);
      var txtHeader = txtWrote;
      if(txtWrote.indexOf('[')==-1)
        txtHeader = authorName + ' ' + txtWrote;
      else
        txtHeader = replaceVars(txtHeader, authorName, postTitle, cmtDate);
      var tooltip = replaceVars(txtTooltip, authorName, postTitle, cmtDate);
      if(!/#/.test(href)) href += "#comments";
      document.write('<div title="'+tooltip+'" class="recent-comment'+clsAdmin+'">');
      document.write('<div title="'+tooltip+'" class="recent-comment-header'+clsAdmin+'"><div title="'+tooltip+'" class="recent-comment-ico'+clsAdmin+'">'+imgcode+'</div><a title="'+tooltip+'" href="' + href + '">' + txtHeader + ' </a></div>');
      if(comment.length < maxCommentChars)
        document.write('<div title="'+tooltip+'" class="recent-comment-body'+clsAdmin+'">' + comment + '</div>');
      else {
        comment = comment.substring(0, maxCommentChars);
        var indexBreak = comment.lastIndexOf(" ");
        comment = comment.substring(0, indexBreak);
        document.write('<div title="'+tooltip+'" class="recent-comment-body'+clsAdmin+'">' + comment + '...</div>');
        if(txtMore != "") {
          var moretext = replaceVars(txtMore, authorName, postTitle, cmtDate);
          document.write('<div title="'+tooltip+'" class="recent-comment-footer'+clsAdmin+'"><a title="'+tooltip+'" href="' + href + '">' + moretext + '</a></div>');
        }
      }
      document.write('<div style="clear:both;"></div></div>');
    }
  }
}
if(getTitles)
  document.write('<script type="text/javascript" src="http://'+window.location.hostname+'/feeds/posts/summary?redirect=false'+maxResultsPosts+'&alt=json-in-script&callback=getPostUrlsForComments"></'+'script>');
document.write('<script type="text/javascript" src="http://'+window.location.hostname+'/feeds/comments/default?redirect=false'+maxResultsComments+'&alt=json-in-script&callback=showRecentComments"></'+'script>');
</script>
<!--<style>
div.feedburnerFeedBlock ul li {
list-style-type: circle;
margin:0 0 0px 10px;
padding:5px 5px 5px 5px !important;
}
div.feedburnerFeedBlock ul li:hover {
list-style-type: disc;
}
div  #creditfooter{
display: none;
}
</style>
<script src="http://feeds2.feedburner.com/truebloggingtrickscomments?format=sigpro" type="text/javascript"></script>-->
<div class='clear'></div>
  • Click on save button and you done it. 

Customization

  • Replace truebloggingtricks with your blog feedburner username.
  • Set number of comments to show 6
If you are facing any kind of problem related to this tutorial feed free and ask in the below box.
Read more
Thursday, October 30, 2014

How To Remove or Hide Comment Form In Blogger For All Posts ?

Blogging Tips, Blogger Tricks, Blogger Tutorials
Being as a blogger user sometimes we need to remove or hide comment box from all posts and pages. If we do this manually then it will take lots of our precious time or if we going to remove comment box one by one inside blogger editor then it will takes lots days or months. Many bloggers using third party comments like disqus and some others in which they can easily remove and hide comment form. If you use blogger platform then learn some basic tips about to disable or hide comment box in blogger for all posts and pages in blogger. Here is some basic tip will teach you about to hide or disable comment box in blogger blog. So this post all about to hide or turn off comment form in blogger.

Why To Remove or Hide Comment Form ?

This question is rise in our minds that why we need to remove or hide comment form in blogger, because sometimes we have an official blogs for offices, organizations sectors, school, colleges etc in which there is no need to have a comment form because these organization only need to spread their data or information with public. So they never comments on their blogs/websites.

How To Remove or Hide Comment Form In Blogger For All Posts ?

This is very simple tricks you don't need to edit your blog posts or deleting any code from your template. You can do it by adding a piece of code in blogger templates.
  • Goto blogger dashboard.
  • Template >> Edit Html.
  • Search below code.
]]></b:skin>
  • Copy the below code and paste it before/above ]]></b:skin>
#comments {
display: none!important;
}
  • Save your template and you almost done it.
  • Now you have no more comment box in your blogger blog.
If you want to show comment box again you just need to remove the above code from your template. 
Read more
Friday, October 24, 2014

How To Backup And Restore Your Blogger Blog ?

Blogger Tutorials, Blogging Tips
In modern era of internet hacking hacking become more common and we many websites in our daily life which are getting hacked or attacked by malware. If you don't have any backup in this situation then it becomes very difficult mostly for webmasters and bloggers when to recover from attacks. So what you have to do to hackers. So its easy way always take a backup once a week of your blog. If you have backup of your then you can easily restore your blogger blog. So in this post we will teach you how to backup and restore your blogger blog.

How To Backup And Restore Your Blogger Blog ?

  • Login to your blogger dashboard.
  • Goto setting as i show you in below screen shot.
Blogger Tutorials, Blogging Tips
  • Click on other >> export now a pop up will appear and click on download button. When downloading finished keep keep the download file in safe part of your hard drive.
Blogger Tutorials, Blogging Tips

How To Restore Blogger Blog

Now it's time to restore a blog. Goto setting click on ther other >> import. A pop up will appear and click on choosing file button select your file that you downloaded and enter the captcha code in the small box. Now click on import blog button.
Blogger Tutorials, Blogging Tips
You have successfully restore your blogger blog and i hope you like this article and will also helped it in future when ever you want to restore your blogger blog.
Read more
Wednesday, September 17, 2014

How To Disable Selection of Text and Enable Text Within Blockquotes

Blogger Widgets, Blogger Tricks, Blogging Tips, Blogger Tutorials
Content stealing increasing day by day and they tend to copy the original content from the blog and while publishing on their blog or websites. Sometimes the rank of the duplicators is better than the original blog publisher. They are getting high rank easily without spending bundles of hours on writing posts or articles. This is indeed very awful for the blog owner who's spending his precious time in preparing fresh and unique content and someone easily copy and paste it easily on any where on the web. If you want to make the work more difficult for duplicators who is not try copy your post easily, we must add a Css code to the blog template which will totally disabled the selection of text and also its very difficult for copycats to copying posts from your blog. But at the same time enable the text within enclosed with blockquotes.

Customize Popular Post Widget in Blogger With CSS

Why We Need To Disable Copying Of Text On Blog

There are many plagiarism issues we must take care of our contents and keep eyes on it 24 hours. One the biggest problem for those who's running Google Adsense account Because soon Google will disable Adsense account if they found your content many times on different locations on the internet. So the latest Google Panda have a strict rules against copyrighted contents. So we must check our content trice times a day that who is trying to copy our posts, contents or articles. So below i will provide i Css code which will help you to disable the selection of texts in blogger. So that no can easily copy or steal your content from the blog. So if you run a technology blog and provides a code to users and want to prevent them from copying any other text enclosed with blockquotes follow the below tutorial.

How To Disable Selection of Text and Enable Text Within Blockquotes ?

To know that how to disable how to disable selection of text forever in blogger, so we will provide you a Css code which will completely disable the left click on your blogger blog. So follow the steps carefully which will guide you completely about adding this code.
  • Login Blogger Dashboard.
  • Goto template and click on Edit Html.
  • Find the below code by pressing Ctrl+F.
]]></b:skin>
  • Now the paste the below code above/before ]]></b:skin>
.post blockquote{-webkit-user-select: text;
-moz-user-select: text;
-ms-user-select: text;
user-select: text;
}
body {
-webkit-user-select: none;
-moz-user-select: -moz-none;
-ms-user-select: none;
user-select: none;
}
  • After pasting the above code click on save button and content is being protected from copied.
Read more
Sunday, September 07, 2014

Guest Posting and It's Benefits - Complete Guide

Recently we discussed How To Make Your Blog Faster With Lazy Image Loading Script in our blog. Blogging has many ups and downs and today we are going to discuss something interesting, so its guest posting or guest blogging. If you don't know about guest blogging then this article is specially for you because here we will going to discuss completely about guest blogging, its benefits and how to do that. So friends lets begin and read this carefully to understand it easily.

What is Guest Blogging ?

Guest blogging is the latest tend in the era of blogging which is increasing rapidly. Its a proper way to appear yourself on the other blogs with a fresh content as a guest blogger. In the guest blogging you are invited to contributed on any other blog. You have to read the rules and regulations and then you write or generate a post, after completing your post you will submit to blog that where you want post your article as guest.

Why You Should A Guest Post ?

This question will surely rise in your mind that you write a guest on other blogs or what is the benefit behind the guest posting ? Let me clear that, guest posting has many benefits to blog guest and blog owner. So lets explain the guest author benefits.

Benefits of Guest Author

If you are guest blogger and you have to publish your on another blog as a guest blogger. The first thing that blog owner will created the little author box in the bottom of the post for guest authors. Where you will get a do-follow back-link to your blog with help of social links. With author box readers will know that who's written this article and if they liked your post they land on your blog by this way you will get a good traffic, readership and visitors which is the need of every blogger. The second and most important thing is if the blog where you submitted you post is having a good page-rank and alexa ranking then you will definitely get in your own blog page-rank and alexa ranking.

Benefits For Blog's Owner

So if you are the owner of the blog and you are accepting the guest post on your blog, the blog owner will and have benefits. The first thing is his/her blog will updated regularly if have good numbers of guest posts. The second thing is that it saves a time for blog owner to writes its own posts. But publishing too much guest post is not good than your own posts. Before publishing guest post you must check that it is unique or copied from anywhere else.  It will conjointly increase the engagement between the guest authors diary and therefore the guest post acceptiing blog's readers.

Choosing Good Blog For Submitting Guest Post

Before submitting a guest post on any blog it's very important to choose the good blog, let me help you in choosing it. The good blog will related will be related to your submitted posts so the readers of the blog engaged or land on your also. Another thing is that you must the page rank and alexa rank it must have the good ranking in both algorithms. The third thing is it should be free of cost, and last thing is that must be a good traffic and readership. With the help of readership you can check the total number of comments in each post and also feed-burner subscribers. If the blog have all the things which i mentioned above you should surely submit your post there because these are the things which helps you in getting benefits from your guest post.

Getting Guest Post Accepted and Published

I don't thing that there is the big problem of approval guest post every blog has own rules and regulations before submitting you must them carefully. Here below is the list of some rules to get accepted and published you post.
  • Avoid Duplicate and Copied Content: This is one of the most and popular thing that every blog requires the post that you submitted is unique and not copied from anywhere else. If you submitted a copied content then it will be caught because before publishing your post they will check that with a several tools.
  • Well Written Content: The second thing is that they check the article is well written or not. First they read the article and find the mistakes in it. Sometimes it correct the little mistakes and publish the post but should be better to re-check the post before submitting your article and correct all the mistakes.
  • Content Length: This is also the important part you should read the rules where you want to submit the post and accordingly you should write the article but usually everyone ask for more than five hundred words.
  • Keyword Topic: This is another big mistake which done by many bloggers in guest blogging that they choose awkward topic. Once you read the rules of the of the blog then you will know that what kind guest posts are allowed on the blog for guest post.
  • Requirements: When you fill all the requirements and follow each rule then you will get your post accepted, approved and published. Simply you read the rules in guest or write for us page.

Final Words

So friends this is the complete guide for new bloggers and newbies about guest posting. I think this surely enough to understand even you need a help then you can surely ask in comment area Whats your ideas about this article ? Share your views in the comments box. Take care Happy Guest Blogging!
Read more
Wednesday, August 27, 2014

Make Long Post Short on Blogger Homepage With Read More Option

On blogger there is a option to add a jump break to your posts, so the post will show with a short summary on homepage and also a link with a full post. The jump break have some great advantages, if you displays you full post on your blog homepage it will slow down your blog load time but with a jump break visitors that land on your blog homepage will see the selection of your posts without need to scroll. It's also more professional and visitors have to click to the full post and will helps ti increases the pages views.

Yesterday i received a request from one of my blog reader requested for make a long post short on blogger homepage.

"Hello bro there is a problem on my blog homepage, my blog post is very long how i make it like yours where by post will only show not all the whole details will just show, is there any way to make it short"

Blogger Tricks, Blogger Tutorials, Blogging Tips
The above statement was sent to me to my Facebook account by one of regular reader of this blog. Today i will show to you how to summarize a blog content and how to show summary content with "read more" option on blog homepage, blog archives, blog labels page using automatic "read more" simple script in your blog template. Using read more on your blog will make your blog loading faster by showing with a few post instead of the full post on blog homepage and it will make your more good and professional.
Automatic read more for blogger users can be done by adding some code into blog template. Below are the simple tutorial on how to install Automatic Read More For Blogger with thumbnails and how it will look after installation.

Summarize Your Blog Content With Read More Option

Step-1
  • Login to your blogger dashboard.
  • Goto template.
  • Click on Edit Html.
Step-2
Find the below code by pressing Ctrl+F
</head>
  • Copy the following code and paste it Above/Before </head>
<script type='text/javascript'>
var thumbnail_mode = "no-float" ;
summary_noimg = 430;
summary_img = 340;
img_thumb_height = 120;
img_thumb_width = 120;
</script>
<script type='text/javascript' src='http://widgets.way2blogging.org/blogger-widgets/w2b-auto-readmore-blogger.js' ></script>
Step-3
  • Now again find the below code in the template by pressing Ctrl+F
<data:post.body/>
Step-4
  • Replace the following below code with <data:post.body/>
<b:if cond='data:blog.pageType == &quot;item&quot;'>
<data:post.body/>
<b:else/>
<b:if cond='data:blog.pageType == &quot;static_page&quot;'>
<data:post.body/>
<b:else/>
<div expr:id='&quot;summary&quot; + data:post.id'>
<data:post.body/>
</div>
<script type='text/javascript'>
createSummaryAndThumb(&quot;summary<data:post.id/>&quot;);
</script>
<div style='clear: both;'/>
<span class='rmlink' style='font-weight:bold;padding:5px;float:right;text-align:right;'><a expr:href='data:post.url' >Read more ... </a></span>
</b:if>
</b:if>
Step-5
  • Save your template.
That's it all of your posts including on home page, archived page, labels page will now be displayed with summary and read more option.
Add your comments, views and opinions below.
Read more

How To Change Blogger Template

Beginners Guide, Blogger Tricks, Blogger Tutorials, Blogging Tips
Are you using blogger default template ? Do you want a professional template for your blogger blog ? If yes then read this post carefully from top to bottom. In our today post we are going to discuss completely about that how to change blogger template. As a blogger users everyone should know all tips and tricks about how to change or replace a blogger template with new one. Many blogger users don't know about changing blogger template. Since from a couple of day we have receive many mails from new bloggers and newbies for asking about changing blogger template inside new blogger interface. They are facing many problems in new interface blogger even they don't know the exact use.

Change Default Blogger Template into Professional Template

Turning your blog into professional look. As you know that first impression is the last impression, as the phrase telling us try to keep every thing neat, clean, designable and stylish so that users likes our job in first impression. A professional theme will help to attract more visitors and will make your blog design more perfect for viewers.

Visit: 10 Best Premium SEO Templates For Blogger

Always try to use a premium and professional template instead of blogger default template. It will not only help to make your blog stylish and also protect from so many bugs which has the blogger default template. Also you do not need to customize it because they customized from designers. All the customization and main features will be shown just scroll below.

Features of Using Professional Templates

There are many uncountable features of premium or professional templates. Here you will learn some basic features why pro-bloggers are using professional templates. Remember one thing if you are serious in the field of blogging and want to do something better, so this is the most difficult job to and builten blogger template with a professional one. So your blog becomes well know for robots and readers.
  • Robots lover
  • Friendly SEO
  • Good Designing
  • Attracted Visitors
  • Increase Readership
  • Fast loading page

How To Change Blogger Template ?

In this section you will learn the basic things tips how to add new blogger template in new interface. This is very simple process for newbies so don't worry about it. You will completely guide about this. Below are steps follow it carefully and correctly. First you will need to download a premium or professional template online template website. You can also download top best premium seo templates for your blog from the link which mention above and download the best template according to your choice.

  • Login to your blogger dashboard.
  • Click on the blog you want to change a template.
  • Now follow the steps carefully with the help of screenshots.
Step-1
  • Simple click on template
Beginners Guide, Blogger Tricks, Blogger Tutorials, Blogging Tips
OR
Beginners Guide, Blogger Tricks, Blogger Tutorials, Blogging Tips
Step-2
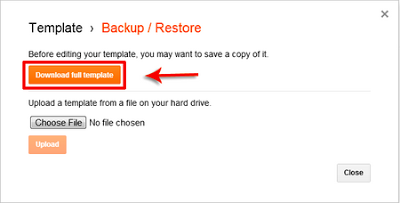
  • Click on Backup/Restore button.
Beginners Guide, Blogger Tricks, Blogger Tutorials, Blogging Tips
  • It will better for you to download the current template first.
Beginners Guide, Blogger Tricks, Blogger Tutorials, Blogging Tips

Step-3
  • Now its time to select a template file from PC which you want to apply on your blog.
Beginners Guide, Blogger Tricks, Blogger Tutorials, Blogging Tips
Step-4
  • Click on upload button.
It will takes some moments when you click on upload button until loading is complete and then refresh your blog. After refreshing your blog you will see a nice template on your blog. Now the same steps whenever you want to change the blogger theme.

Final Words

Guys is this the tutorial which guide you in simple and easy steps about change template in blogger by using this simple method. Hopefully this tutorial will helps you a lot keep visiting for latest blogger tips and tricks. Thanks!
Read more
Sunday, August 24, 2014

How To Insert Attractive Table of Contents Page Sitemap in Blogger

Beginners Guide, Blogger Tutorials, Blogger Widgets, Blogging Tips
It is very important for publisher to add a Sitemap (Table of Contents Page) is his/her blog to make more good and professional. So basically Sitemap (Table of Contents Page) is the place of your blog where all the posts are posts are arrange according to their type and category. That's why we are going to tell you that How To Insert Table of Contents Page in Blogger.
The design of the table of contents in blogger is quite beautiful and will automatically update, you don't need to worry just edit it every time when you publish or create a new post. When you publish a post table of content page will added automatically and it will saves lots of time. The table of content page display all of your post in specific categories (Labels) and display all of your posts well arranged.
This widget is purely designed with CSS so it looks really attractive, and it will show the latest post showing with text News!. So lets begins our finger tips rolling over the tutorial.

Features

  • The Sitemap (Table of Contents) will added latest post when you update your blog.
  • It will tag your new post automatically as a New! in Table of Contents.
  • All of your blog posts will arranged automatically under there given categories.

How to Add a Sitemap (Table Of Contents) in Blogger ?

  • Login to your blogger dashboard.
  • Goto Pages >> New Page >> Blank Page.
  • Write a title of a page.
  • Click on HTML copy the whole code and paste it inside.
<style>
p.labels a{color: #242424; text-transform: uppercase;font-size: 15px;}
a.post-titles {color: #0000FF;}
ol li{list-style-type:decimal;line-height:25px;}
</style>
<script>
//<![CDATA[
var postTitle=new Array();var postUrl=new Array();var postPublished=new Array();var postDate=new Array();var postLabels=new Array();var postRecent=new Array();var sortBy="titleasc";var tocLoaded=false;var numChars=250;var postFilter="";var numberfeed=0;function bloggersitemap(a){function b(){if("entry" in a.feed){var d=a.feed.entry.length;numberfeed=d;ii=0;for(var h=0;h<d;h++){var n=a.feed.entry[h];var e=n.title.$t;var m=n.published.$t.substring(0,10);var j;for(var g=0;g<n.link.length;g++){if(n.link[g].rel=="alternate"){j=n.link[g].href;break}}var o="";for(var g=0;g<n.link.length;g++){if(n.link[g].rel=="enclosure"){o=n.link[g].href;break}}var c="";if("category" in n){for(var g=0;g<n.category.length;g++){c=n.category[g].term;var f=c.lastIndexOf(";");if(f!=-1){c=c.substring(0,f)}postLabels[ii]=c;postTitle[ii]=e;postDate[ii]=m;postUrl[ii]=j;postPublished[ii]=o;if(h<10){postRecent[ii]=true}else{postRecent[ii]=false}ii=ii+1}}}}}b();sortBy="titleasc";sortPosts(sortBy);sortlabel();tocLoaded=true;displayToc2();document.write('</br><div class="sitemap-link"><a href="http://www.truebloggingtricks.net/2014/08/how-to-insert-attractive-table-of.html" style="font-size: 10px; text-decoration:none; color: #5146CD;">Get This Widget</a></div>')}function filterPosts(a){scroll(0,0);postFilter=a;displayToc(postFilter)}function allPosts(){sortlabel();postFilter="";displayToc(postFilter)}function sortPosts(d){function c(e,g){var f=postTitle[e];postTitle[e]=postTitle[g];postTitle[g]=f;var f=postDate[e];postDate[e]=postDate[g];postDate[g]=f;var f=postUrl[e];postUrl[e]=postUrl[g];postUrl[g]=f;var f=postLabels[e];postLabels[e]=postLabels[g];postLabels[g]=f;var f=postPublished[e];postPublished[e]=postPublished[g];postPublished[g]=f;var f=postRecent[e];postRecent[e]=postRecent[g];postRecent[g]=f}for(var b=0;b<postTitle.length-1;b++){for(var a=b+1;a<postTitle.length;a++){if(d=="titleasc"){if(postTitle[b]>postTitle[a]){c(b,a)}}if(d=="titledesc"){if(postTitle[b]<postTitle[a]){c(b,a)}}if(d=="dateoldest"){if(postDate[b]>postDate[a]){c(b,a)}}if(d=="datenewest"){if(postDate[b]<postDate[a]){c(b,a)}}if(d=="orderlabel"){if(postLabels[b]>postLabels[a]){c(b,a)}}}}}function sortlabel(){sortBy="orderlabel";sortPosts(sortBy);var a=0;var b=0;while(b<postTitle.length){temp1=postLabels[b];firsti=a;do{a=a+1}while(postLabels[a]==temp1);b=a;sortPosts2(firsti,a);if(b>postTitle.length){break}}}function sortPosts2(d,c){function e(f,h){var g=postTitle[f];postTitle[f]=postTitle[h];postTitle[h]=g;var g=postDate[f];postDate[f]=postDate[h];postDate[h]=g;var g=postUrl[f];postUrl[f]=postUrl[h];postUrl[h]=g;var g=postLabels[f];postLabels[f]=postLabels[h];postLabels[h]=g;var g=postPublished[f];postPublished[f]=postPublished[h];postPublished[h]=g;var g=postRecent[f];postRecent[f]=postRecent[h];postRecent[h]=g}for(var b=d;b<c-1;b++){for(var a=b+1;a<c;a++){if(postTitle[b]>postTitle[a]){e(b,a)}}}}function displayToc(a){var l=0;var h="";var e="Post Title";var m="Click to sort by title";var d="Date";var k="Click to sort by date";var c="Category";var j="";if(sortBy=="titleasc"){m+=" (descending)";k+=" (newest first)"}if(sortBy=="titledesc"){m+=" (ascending)";k+=" (newest first)"}if(sortBy=="dateoldest"){m+=" (ascending)";k+=" (newest first)"}if(sortBy=="datenewest"){m+=" (ascending)";k+=" (oldest first)"}if(postFilter!=""){j="Click to view all"}h+="<table>";h+="<tr>";h+='<td class="header1">';h+='<a href="javascript:toggleTitleSort();" title="'+m+'">'+e+"</a>";h+="</td>";h+='<td class="header2">';h+='<a href="javascript:toggleDateSort();" title="'+k+'">'+d+"</a>";h+="</td>";h+='<td class="header3">';h+='<a href="javascript:allPosts();" title="'+j+'">'+c+"</a>";h+="</td>";h+='<td class="header4">';h+="Read all";h+="</td>";h+="</tr>";for(var g=0;g<postTitle.length;g++){if(a==""){h+='<tr><td class="entry1"><a href="'+postUrl[g]+'">'+postTitle[g]+'</a></td><td class="entry2">'+postDate[g]+'</td><td class="entry3">'+postLabels[g]+'</td><td class="entry4"><a href="'+postPublished[g]+'">Read</a></td></tr>';l++}else{z=postLabels[g].lastIndexOf(a);if(z!=-1){h+='<tr><td class="entry1"><a href="'+postUrl[g]+'">'+postTitle[g]+'</a></td><td class="entry2">'+postDate[g]+'</td><td class="entry3">'+postLabels[g]+'</td><td class="entry4"><a href="'+postPublished[g]+'">Read</a></td></tr>';l++}}}h+="</table>";if(l==postTitle.length){var f='<span class="toc-note">Show All '+postTitle.length+" Posts<br/></span>"}else{var f='<span class="toc-note">Show '+l+" posts by category '";f+=postFilter+"' the "+postTitle.length+" Total Posts<br/></span>"}var b=document.getElementById("toc");b.innerHTML=f+h}function displayToc2(){var a=0;var b=0;while(b<postTitle.length){temp1=postLabels[b];document.write("<p/>");document.write('<p class="labels"><a href="/search/label/'+temp1+'">'+temp1+"</a></p><ol>");firsti=a;do{document.write("<li>");document.write('<a class="post-titles" href="'+postUrl[a]+'">'+postTitle[a]+"</a>");if(postRecent[a]==true){document.write(' - <strong><span style="color: rgb(255, 0, 0);">New!</span></strong>')}document.write("</li>");a=a+1}while(postLabels[a]==temp1);b=a;document.write("</ol>");sortPosts2(firsti,a);if(b>postTitle.length){break}}}function toggleTitleSort(){if(sortBy=="titleasc"){sortBy="titledesc"}else{sortBy="titleasc"}sortPosts(sortBy);displayToc(postFilter)}function toggleDateSort(){if(sortBy=="datenewest"){sortBy="dateoldest"}else{sortBy="datenewest"}sortPosts(sortBy);displayToc(postFilter)}function showToc(){if(tocLoaded){displayToc(postFilter);var a=document.getElementById("toclink")}else{alert("Just wait... TOC is loading")}}function hideToc(){var a=document.getElementById("toc");a.innerHTML="";var b=document.getElementById("toclink");b.innerHTML='<a href="#" onclick="scroll(0,0); showToc(); Effect.toggle(\'toc-result\',\'blind\');">?? Display Table of Contents</a> <img src="https://blogger.googleusercontent.com/img/b/R29vZ2xl/AVvXsEjYF2XXwQV549hLFLzmPOJ46KsjsvgLznI0jONPiqjlz5oTGDpgKiggTSNwd_sfEASTFAiGIYYngXzZ3_arSPF9L8jCPYp28Tx7x3syqPLIssFVtkgA4jbqumGgjjc1YSuBwr_ocrYJOFlQ/s1600/new_icon.gif"/>'}function looptemp2(){for(var a=0;a<numberfeed;a++){document.write("<br>");document.write('Post Link : <a href="'+postUrl[a]+'">'+postTitle[a]+"</a><br>");document.write('Read all : <a href="'+postPublished[a]+'">'+postTitle[a]+"</a><br>");document.write("<br>")}};
//]]>
</script>
<script src="http://truebloggingtricks.blogspot.com/feeds/posts/default?max-results=9999&amp;alt=json-in-script&amp;callback=bloggersitemap"></script>
  • After pasting the above code click on publish button. 

 Customization

Replace truebloggingtricks.blogspot.com with your blog url. If you want to change font color and size categories replace your color with Red, and if you want to change colors of link then replace your color with the Green.

I hope you like this tutorial, if you have question or feels any difficulties regarding this tutorial feel free and post it in the comment box. Happy Blogging
Read more
Thursday, August 14, 2014

How To Create Static Pages in Blogger

In our recent post we already differentiate posts and pages in blogger. However most of the peoples still don't know that how to create pages in blogger ? Pages are considered the most important part of blog as they assist in creating about page, contact page, policy page which are updated on the daily basis like posts. So if you are looking for creating a specific page, so in today article we will show you how to create a static pages in blogger.

What are Static Pages?

Static pages displays information to all users which are not updated frequently. Pages are not shown on page in blogger or archive pages. it have specific URL to make view-able. They don't have categories or labels.
Beginners Guide, Blogger Tutorials, Blogging Tips

There are some limitation in blogger, so you are not allowed to create more than 20 pages per blog. However 20 pages are enough for any kind of blog, because blog mostly relies on posts. Even True Blogging Tricks have only 3 pages.

How to create Static Pages in Blogger?

First login to your blogger dashboard. Now goto your Blog >> Pages >> New Pages which allows you to create a blank page. You can add text, images, codes and whatever you want. The interface is identical to which you see while creating a posts. You can also choose a title, content and many other things and important thing of your page just like you do while writing an article.
Beginners Guide, Blogger Tutorials, Blogging Tips
Once you done everything, simply click on publish button and your page will added successfully to your blog. Remember their is no permalinks option in the page, so before write page title first which become permalinks latter on. Something like this if the page title is About Me then permalink like this http://www.truebloggingtricks.net/p/about-me.html
Beginners Guide, Blogger Tutorials, Blogging Tips
I hope this tutorial will help to create static pages in blogger without facing problems. You can create about page, contact page and many pages of your choice. Let us know that how many you are using static pages and what are list of pages you create on the blog ? Share it in the below comment box.
Read more
Tuesday, August 12, 2014

How To Setup Feedburner Email Subscription in Blogger

Blogger Tutorials, Blogging Tips
Its very difficult when someone creates a new blog. It is very hard in the initial days for good content, proper template, SEO, creating different accounts, blog setting etc. When the time comes email subscription many bloggers get confused that which email service is good for their blog. So their are many free and paid email services but Google Feed Burner is the most popular among them. It is a little bit difficult to setup the email subscription in Google Feed Burner. So in this article we are going to show that how can you Setup Feed Burner Email Subscription in Blogger Blogs.

What is Feed Burner Email Subscription ?

Basically it is the feed mail service which helps to spread your's blog content automatically to subscribed readers When we setup email subscription in our blog and then someone subscribed our blog through using feed burner they will all the update of the blog straight in inbox. Feed Burner is the most powerful tool which helps to mange email subscribers automatically sending them blog updates. There are many reasons that we setup Feed Burner Email Subscription, it also helps to serve the blog readers better.

How To Setup Feed Burner Email Subscription ?

I have already said that new bloggers faced many problems in the setting of feed burner email subscription for their blogs. I hope this tutorial will finish this problem. We will divided this tutorial in three steps, which helps you to understand with ease.
Step 1
  • Goto feedburner.google.com
  • Login with your Gmail account.
  • Paste your blog URL in the box and click on next button like in the below screen shot.
Blogger Tutorials, Blogging Tips
  • Mark on "Atom Feed" and click on next.
How To Setup FeedBurner Email Subscription in Blogger
  • Now write feed title and username and click on next.
How To Setup FeedBurner Email Subscription in Blogger
  • You will see a message your feed is live and you done it.
Step 2
  • Open feed dashboard.
  • Click on "Publicize".
How To Setup FeedBurner Email Subscription in Blogger
  • In the sidebar you will see "Email Subscription" click on it.
How To Setup FeedBurner Email Subscription in Blogger
  • Now click on "Activate" button.
  • So your feed email subscription is enabled.
Step 3
  • Again goto "Publicize".
  • Click on "Email Subscriptions".
  • You will see a box filled with coding.
  • Copy the whole code.
How To Setup FeedBurner Email Subscription in Blogger
  • Goto Blogger >> Layout >> Add a Gadget.
  • Click on HTML/JavaScript.
  • Paste the copied code inside it.
  • Click on save button.
  • Congrats! You have successfully setup feed burner email subscription.
Now a subscription box will appear on your blog by which readers can subscribe your blog and can receive latest posts directly in their inbox.

Final Words

So friends that's how you can setup feed burner email subscription for your blog. I don't think you will face any problem regarding this tutorial as i added screen shots for every step and explained in easy words. However if you have any issue feel free as in comments and also share your thoughts about it. Also share this tutorial with your friends, take care and Happy Blogging.
Read more
Sunday, August 10, 2014

What is Difference Between Posts and Pages in Blogger

Every blogger users are confused about posts and pages. There are two types of contents like posts and pages comes by default with blogger. Beginner users always when to use post and pages because these two options are much identical to each other. It appears to have a similar of blogger dashboard. It looks like on similar on blog/website. So why we need to use both of them what is the difference between posts and pages ? When i use Posts  and When i use Pages ? In this article we will explain completely the difference between and posts and pages in blogger.
Beginners Guide, Blogger Tutorials, Blogging Tips

What are Posts ?

Users of blogger prefers to choose posts for the majority of blog updating. Posts are like entries which displays your blog contents on the basis of publishing timing. Mature posts are archived on the basis of months and years. When the posts get maturity users have to dig the site to reach them. There is also a option called "Labels" which enables to categorize your posts in good manners.
Beginners Guide, Blogger Tutorials, Blogging Tips

Post usually contains timely content meant for educational purposes like tutorials, news, discussion, opinion etc which mutually bring up a blog. The posts appear in chronological order on the homepage of blog. You can also RSS Feed Burner by which you can deliver your articles to your users via email subscribers post encourage discussion.If you want to spread spread or socialize your articles use social plugins and allow your users to share your articles on different social networks like Facebook, Twitter and Google+
Beginners Guide, Blogger Tutorials, Blogging Tips

By default they also have commenting feature which allow users to comment it on certain topic. However you can also off commenting option through setting.

What are Pages ?

Basically pages contain static content that is not a sensible such as about page, privacy policy page, term and condition and so on. All the publish dates are recorded in blogger database. Pages have no expiry because they newer get outdated. If you created about page for your brand now how often you update your page may be once a year ? There is no time and date to attached to the pages. By default no RSS Feeds included.
Beginners Guide, Blogger Tutorials, Blogging Tips

Pages do not support any social buttons or any additional gadgets like comments feature because you probably don't want to see users comments on privacy policy page. In pages we can easily change their order. It allows us to change their order of pages by drag and drop. Blogger supports only 20 pages it means that you can create only 20 pages per blog.

Difference Between Post vs Pages

Following are list of few differences that we found in both content. Which surely need some attention.

Posts
Pages
Unlimited
Not Unlimited
Timely
No Expiry
Appears at Home Page
Pages are not Appears
Social friendly
Pages are not
Has Categorize
Pages are not
Acceptable in RSS
Pages are not
Neant to Gain Attention
Pages are for Marketing

FAQ

People normally ask that is there any SEO advantage using one other ? Remember that search engines always love content. In short words there is no need to worry about that always try to focusing on your content.
Read more
Wednesday, July 02, 2014

Best Online Tools To Copy Text From Images

Best Online Tools To Copy Text From Images
Sometime we need copy text from images but its very worried that How To Copy Text From Images. It become very difficult  job when some need a thousand of words image for their project or for any other purposes.But we can do it manually if their is few text line and it is in the image form than you do it in few seconds. The solution of this problem is very simple never tense about it. I researched it very deeply and fine some easiest and simple ways to get or pick text from images in very less time. The first method download and install the software in you PC but sometimes its getting very hard to get free or registered to using the software. The second method is we will share it in this post with some online tools which helps you a lot to use it and copy text from images.

How To Copy Text From Images ?

Read more
Monday, June 30, 2014

What Is Alexa And How To Use It ?

Alexa is the leading provider of worldwide webs measurement. You can search the rank of any website by category, keyword or country rank. Website rank is calculated on the daily bases it also provides the website rank in the specific country. The rank in the specific country is calculated of the popularity in the specific country.
Alexa, SEO

Function of Alexa Ranking

  • It updated on the daily basis.
  • The web rank is created on the basis of three months historical traffic data.
  • Rank is calculated on the basis of average daily visitors to specific site.

How to Improve Alexa Ranking ?

Below are the some important tips to improve your Alexa rank just them carefully.

This the first and easy way to download  Alexa rank toolbar use it every day to visit your own site.
  • Writing Reviews on Top Sites
Write your reviews on top Alexa sites and also add your blog URL. You can also check top 500 websites at http://www.alexa.com/topsites. Remember when you write your review be sure write your URL specifically.
  • Encourage Your Visitors
Encourage your visitors and readers to add a positive review on Alexa about your site. This can be done by adding Alexa page rank on your site and asking to visiting "Click here to rate this website".
You can also use Alexa widgets like Alexa Page Rank Widget, and Review On Website. Alexa Rank Widget displays site rank.
So these are the some basic tips to improving your Alexa site rank just follow then carefully and best of luck.

Read more

Contact Form

Name

Email *

Message *


Blog Archive

Support Us

About Author

Hi Friends, my name is Rj HaSsan and i m 20 years old, certified SEO consultant, addicted blogger and the Entrepreneur of True Blogging Tricks who based out of the wonderful country name "Pakistan". ...Read More